Monday, October 17, 2011

Week 2.5

Well, it only took 2 weeks for me to get behind.  I'm only a day behind though so not too bad.  I was stuck mowing the yard yesterday.  Anyone who knows me knows I don't mow, but with dh out of commission I had to either hire someone or suck it up and do it myself.  I figured it would only be once since the weather is cooling off; I sucked it up.  I'm not built for doing exertion type things out in the heat even a temperate 85 F.  Yes, it was only one day out of many, but I'm using my husband as my excuse.  He worked from home all week and required care.  I worried about him when we would leave and tried to maintain quiet when he was napping, which was a lot.  Today he went back to work and he is doing much better these last few days.  All of this is a long way of saying shit happened and I got behind.

This week I will do another craft at the end of the week to make up for it so that I still am on track.  Here now is last this weeks craft.

Jar Luminaries from Crafts by Amanda
These were pretty simple.  Kitten (my daughter) even got in on the action this week.  She has asked about making a fabric bowl from last week, but we haven't gotten around to it yet.  This, however, was irresistible.

Supplies were pretty basic:
Glass jars (plastic would work too if you think the paint will stick)
Acrylic Paint in your choice of colors
Brushes
Water
Candles


A note on the jars: make sure that at least one side is smooth.  My jars have raised letters on one side so I put that side to the back.  I have some little pint jars that are round and would have made cute pumpkins if it weren't for all the decorations that are on the glass.


I keep my canning jars in the garage so they were a bit dusty.  I just wiped the dust off since I'm not eating out of them and was feeling too lazy to wash them.

Next step was pretty straight forward, paint the jars.
I painted three jars and let Kitten do the fourth.  It took us about the same amount of time, but more on that later.


Here she is making a dark purple by mixing black and lavender.  I followed Amanda's instructions and just did one layer of paint.  Bonus, it takes less time.  I decided to just freehand my faces like she did.  I'm not very artistic, but I felt this was on my skill level.


Drawing them on with the sharpie was a little difficult.  The paint kept trying to peel off.  I'm not sure if this is because I didn't let it dry very long or if the jars were still a little dusty.  The paint on the white jar was a little thicker so it had to dry longer before I could do the face.
 Here they are after I filled in the sharpie outline with black paint.  This really was a super easy craft and so fast.  Now I just had to wait for it to get dark so we could check them out with candles inside.
Hmm, looks pretty dark now.  Time for a light.

I like the way they look even better in person.


Now for the breakdown.  Overall this craft was fun, fast and easy.
A few notes:

Don't put the paint on too thick or your candle won't show through.  Kitten was trying to avoid brush lines and her paint ended up a little thick.  This made the candle lighting anti climactic.

Lighting the candles is a pain.  I plan on picking up some LED tea lights later this week.

I didn't put the glaze on my jars since unlike Amanda I use these jars for food pretty regularly.  This way at the end of the holiday season I can simply scrub off the paint and put them back with the rest of my canning jars.  No figuring out where to store more breakable decorations  either.


Friday, October 07, 2011

Week 1

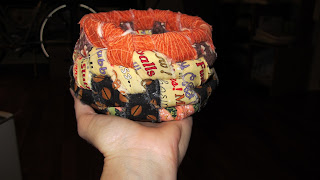
This week's craft is a fabric bowl.  I used the tutorial here at Prudentbaby.com.  I won't go over all the instructions again, just how it went.  I gathered all my supplies and since it was way cheaper I bought a big honkin' box of 1/2 " cotton piping.

I used the handy dandy iPad to follow along with the instructions while I worked.  Ripping the fabric into strips was messy, but sort of fun.  This was something kids could definitely help with.  I ended up with a big pile of strings doing it this way instead of cutting, but the point is to follow the instructions. 


So far so good.  Next step is to start wrapping.

The first twist is a little difficult and it was hard to get a snug fit.  The next issue I had was finding places to pull the fabric through on the wraps that went around two rows of piping.  The wraps block the space between the top and bottom rows which also prevents the wrap on the next row up from being able to go through in that spot.  I was prepared to persevere, but right after this picture I received a phone call from my husband.  He had broken his collar bone and was on the way to the hospital.
 I won't post a picture of that, let's just say that 8 hours, surgery and some fancy hardware later we made it home.  Here is how I left my project.  Fast forward to this morning and I was ready give it another go. 

 Yes my jammy pants are pretty sweet.  My intent was to make a bowl with a flat bottom and straight sides.  Here I am working on the bottom of the bowl.  As it got bigger around I was able to get a better pattern going with regard to the parts that go over two layers of piping. 


Here you can see that I have just started stacking the coils for the sides.  At this point my in-laws called.  For some strange reason I'm sure none of us can relate to they wanted to see their injured son to reassure themselves that he was okay.  Parents!  I spent the next four hours cleaning my very messy house.  Fast forward again.  I was able to push the fabric through with my fingers more easily than grabbing it with the hook so I did that for the remainder of the bowl.  It didn't take long to finish up since it is fairly small.


It turned out more beehive shaped than I was aiming for.  The size is good and this was a fast project.  I chose the colors to not show dirt since I don't think it can be washed.  There are some spaces where I didn't wrap through two levels of piping often enough.  This caused gaps like this one.

See my finger poking through there between the base and the side.  Here is the bowl in use.


The hole isn't a problem for a bowl holding cat toys.  The piping is cotton, but says dry clean only.  I'm thinking it could be hand washed if need be.  All in all the tutorial was good.  The project was fast and turned out reasonably well.  I think I will try it again and I think kids could do this project too. I couldn't really time it with all the starts and stops, but I would guess that a small bowl like this is a couple of hours start to finish.  The bigger you make it the longer it would take, but as I found out it is a project that you could break up and do over the course of several days. 

Next week I am thinking about trying to find a Halloween related craft.  We'll see what I can dig up.


Thursday, September 29, 2011

A New Goal for a New.. Month?

I follow a lot of craft blogs. Frankly, I love making things. I also like buying craft supplies for the projects I plan on trying. The problem is with little accountability I don't always end up finishing things in a timely fashion. So that's where you, the one person who follows my blog, come in. I am going to attempt 50 craft projects, one a week, in one year. Yes, I know a year is 52 weeks, but I'm hoping to go on vacation next year so I'm building in a cushion. I don't know if they will all be projects I find online. I haven't thought that far ahead. Certainly many of them will be since I have a que of bookmarked projects, many of which I already have the supplies for. I will then write up a review of the project including difficulty, clarity of instruction and quality of the final product. If the craft is intended for children I will attempt to get A to do it with me and let you know how it goes. Also there will be pictures!

Friday, October 31, 2008

Now with Picturey Goodness

Okay so I've been done with the sweater for a while, but.... Yeah, yeah, yeah. I still need to sew it up.


See all the pieces. I can now say I have knit an adult sweater. I just haven't finished it.

I have been working on some other things too. Like Amigurumis. But, like the sweater they are as yet unfinished.


The Octopus is complete, but not attached.


The little devil still needs a cape and some felt for his eyes. Seriously how long could it take for me to pull these together. I'm taking them to the park with me today to work on.

Lastly I leave you with another project. This one is not finished, but for a lack of knitting not sewing, so that's not as bad right? I started this a few weeks ago and have been working on it.


It is the Cable and Lace Poncho from Cool Knits for Kids. There weren't a ton of projects I loved in this book, but I really like this one and a bobble (?!) sweater one.

Of course like all my knitting I seem to be using and extra ball of yarn even though I'm getting all kinds of gauge. This happened with the sweater too. I don't understand it. In the instance of this poncho it is frustrating since I'm working rather quickly, for me, and now the yarn I need is back ordered. I'm just going to keep knitting 'til I run out of yarn.

I think not being a monogamous knitter is causing me problems. When I first started out I wouldn't start something new until I finished what I was working on. Now I don't worry about that as much. It could also be that I have a strong aversion to hand sewing. Hm, maybe I'm on to something with that last bit. I did start making short row toe up socks just to avoid that one tiny seam after all.